


Design Tips : How to create Patchwork in Photoshop
Today, making a colourful patchwork piece doesn't take hours of sewing in material leftovers.
You can let your imagination go loose and create the most wonderful combinations with some fabric printing. The most important step is to create a playful design using Photoshop.
It may be easy for an advanced Photoshop user, but to a rookie, this patchwork photoshop tutorial will come in handy.
Step by step photoshop patchwork tutorial
1. Open a square RGB
Open a square RGB with 150 dpi ( on this example 60 cm x 60cm as the 20cm square size is visually engaging)

2. Create 4 guides
Create 4 guides to place the 9 square designs. Go to View, New guide … Choose orientation horizontal, position : 20 cm.
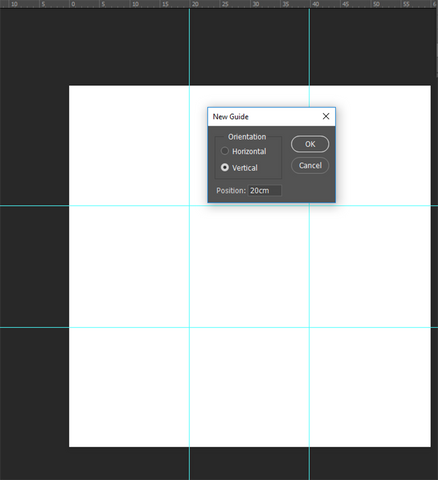
Repeat with horizontal 40cm, vertical 20cm, vertical 40cm. You should have 9 perfect 20cm squares :

3. Place the squares into slots
Place the 9 different squares into their different slots. Open the square design in Photoshop, with the tool Move (v), drag the design into the patchwork file. It will create a new layer that you can rename. Open the Properties window by going to View, Properties. It will show the size of your design in the patchwork. Change the X to 20cm, Click on the link pixel width and height if it isn’t active. It will change H to 20 cm as well. Place the design on the first slot.

Repeat the same action for the 9 different designs. Your patchwork should look like this.

4. Check the alignment
Verify that the patchwork is correctly aligned. Mask the guide by going to View, Show, Guides… ( shortcut: Ctrl+; ) and click it to deactivate. The blue lines should disappear. Adjust the designs if needed.

5. Flatten the image
Go to Layer, Flatten image and your design is ready. Do remember to save your work regularly.
Start printing
With Maake you can print your design on any fabric you want. Your patchwork can become a pillow, a blanket, or even a unique pair of pants.
You can browse through our fabric offer and find the perfect match for your design.

The best fashion fabrics choices in the UK: we choose the best dress fabric

High Quality Printed Swimwear Fabric Choices: What to Choose for Swimsuit Fabrics

The comprehensive apron guide
Subscribe to our newsletter
Promotions, new products and sales. Directly to your inbox.
